Quick Facts
- Function: Password-free Wi-Fi connection for compatible hardware.
- Icon: Two curving arrows forming a circle or a padlock symbol.
- Pairing Window: Typically active for 30 to 120 seconds after activation.
- Safety: Push-button method is significantly more secure than the PIN method.
- Compatibility: Not supported on modern mobile platforms like Android 8.0+ or iOS.
- Troubleshooting: LED lights usually flash amber or white during the active pairing mode.
The WPS button is a feature on routers and extenders that allows devices to join a wireless network without entering a password. It is typically found on the back, side, or front of the hardware and is often marked with a symbol of two curving arrows. Pressing this button activates a brief pairing window, usually lasting between 30 seconds and two minutes, during which a compatible device can establish a secure connection.
Identifying the WPS Button: Symbols and Locations
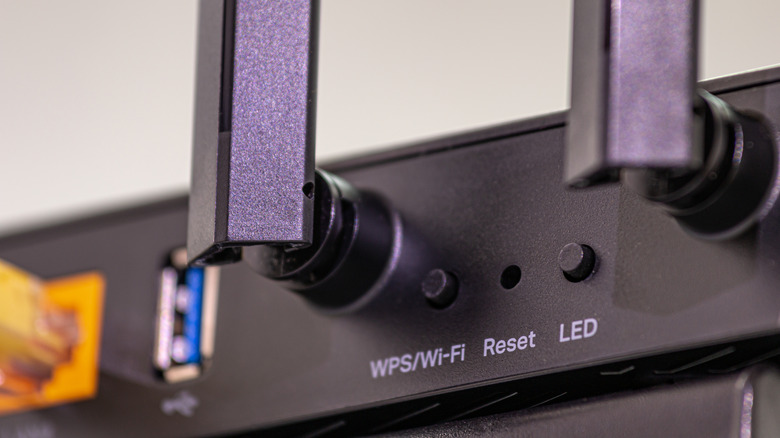
Setting up a seamless smart home experience often starts with the hardware interface of your primary router. Before you can leverage the convenience of Wi-Fi Protected Setup, you must be able to visually identify the trigger. On most modern networking equipment, the button is small and recessed or slightly raised, often placed near the Ethernet ports or the power input.
The universal symbol for this feature is two curving arrows pointing toward each other in a circular motion, though some manufacturers prefer a simple padlock icon or the letters WPS printed directly on the chassis. In the world of IoT connectivity, this button serves as the physical handshake trigger that bypasses the need for a keyboard or screen.
| Brand | Common Location | Symbol/Label |
|---|---|---|
| TP-Link | Rear panel, near the Wi-Fi button | Two curving arrows or WPS/Wi-Fi label |
| Netgear | Front or side panel | Circular arrow icon or a dedicated button |
| ASUS | Rear panel near the USB or WAN ports | Clearly labeled WPS |
| Linksys | Rear panel, often colored red or blue | Wi-Fi symbol or WPS label |
| Google/Eero | Usually managed via app; physical buttons are rare | Software-only interface |
Identifying the physical placement is the first step in locating wps button on different router brands. While most consumer-grade routers include a physical switch, some high-end mesh systems move this functionality into the router firmware settings. If you cannot find a physical button, you may need to log into your router administrative console and look for the Push Button Configuration (PBC) settings to trigger the pairing mode indicator digitally.
Step-by-Step: Connecting Devices Using the WPS Button
Once you have identified the button, the process of connecting devices via WPS is remarkably straightforward. This method is particularly useful for hardware that lacks a user interface, such as a smart plug, a signal repeater, or an older network bridge. The goal is to create a network handshake between the router and the client device within a specific timeframe.
To begin, you must determine how long to hold wps button for pairing mode. Generally, a quick press of 1 to 3 seconds is sufficient. Once pressed, the pairing mode indicator on your router will begin to blink, signaling that the network is open for new connections. You now have a window of approximately two minutes to complete the process on the second device.
For many users, the most common application is connecting wireless printer to wifi via wps button. Follow these steps:
- Locate the WPS option on your printer’s control panel. This is often found under the Wireless or Network settings menu.
- Press the physical WPS button on your router until the light starts flashing.
- Within two minutes, select the WPS option on your printer.
- Wait for the devices to communicate. The router and printer will automatically exchange security credentials.
- Once the connection is successful, the flashing light on the router will typically turn solid or stop blinking, and the printer will confirm it is joined to the network.
This PBC mode (Push Button Configuration) simplifies the setup of complex smart home ecosystems. Instead of typing long, alphanumeric WPA2 encryption keys into a tiny non-touch screen, the hardware handles the heavy lifting. Just remember that the active window is brief, so keep your devices relatively close to each other during this initial sync to ensure the signal is strong and uninterrupted.
Troubleshooting: What to Do if the WPS Connection Fails
Even with the best IoT connectivity strategy, technical hiccups can occur. If your device fails to sync, the first thing to check is the pairing mode indicator. An amber or orange blinking light often indicates a timeout or a failed handshake, while a white or blue blinking light usually means the router is still actively searching.
Common reasons for troubleshooting wps button connection failures include:
- Distance and Obstructions: If the device you are trying to connect is too far from the router, the signal may be too weak to complete the security exchange. Try moving the device into the same room as the router for the initial setup.
- Modern OS Restrictions: It is important to note that Android 8.0 and newer versions have removed support for this method. If you are trying to connect a modern smartphone, you will likely need to enter the password manually, as the mobile operating system views the protocol as a security risk.
- Firmware Disabling: Many security-conscious manufacturers now ship routers with this feature disabled by default. If the button does not respond or the LED does not blink, you may need to enter your router firmware settings to enable the feature.
- Interference: Other 2.4GHz devices, such as microwaves or baby monitors, can disrupt the brief window of the network handshake. Ensure your setup area is clear of electronic noise.
If the hardware button remains unresponsive, you can often trigger the same process through the router’s web interface. This is common with mesh node setup where the secondary nodes might not have their own physical buttons. By initiating the search from the master node's app, you can bypass physical hardware limitations.
Important Security Considerations and Vulnerabilities
While the convenience of a one-touch connection is undeniable, a smart home expert must emphasize the associated WPS security vulnerabilities. The protocol was designed for ease of use, but that simplicity comes at a cost to your network's integrity. The primary concern is not necessarily the push-button method itself, but the PIN-based system that often accompanies it.
Expert Warning: The 8-digit PIN method is a significant weak point. Research has shown that reducing the total required guesses from 100 million to only 11,000 attempts makes the system highly susceptible to automated attacks.
This vulnerability exists because the router validates the first four digits and the last four digits of the PIN separately. A brute-force attack can crack this code in a matter of hours. In fact, a security flaw in the Wi-Fi Protected Setup (WPS) PIN feature allows remote attackers to recover a network's WPA/WPA2 security key in approximately 4 to 10 hours.
To mitigate wps button security risks for home networks, I recommend the following best practices:
- Use Only When Necessary: Only use the physical button for devices that absolutely require it, such as older printers or cheap IoT sensors.
- Disable the PIN Method: If your router allows it, disable the PIN-entry method while keeping the PBC mode active. PIN-based entry is much easier to exploit remotely.
- Turn Off WPS Entirely: For the highest level of security, the best advice on how to disable wps for better network security is to turn the feature off completely in your router firmware settings once all your devices are configured.
- Rely on WPA2/WPA3: Always ensure your network is using strong WPA2 encryption or the newer WPA3 standard. These require a complex password but offer far superior protection against unauthorized access.
By understanding these risks, you can balance the need for a seamless smart home experience with the necessity of keeping your personal data safe from nearby intruders.
FAQ
What is the WPS button and what does it do?
The WPS button is a physical or virtual trigger on a router that enables Wi-Fi Protected Setup. Its primary purpose is to allow a device to connect to a wireless network without requiring the manual entry of a Wi-Fi password. When pressed, it opens a short window for a secure handshake between the router and a compatible client device.
Where can I find the WPS button on my router?
The button is usually located on the back panel near the ports, on the side, or occasionally on the front. It is often identified by a circular icon with two arrows or the letters WPS. If your router has no physical button, the feature may be accessible only through the administrative software interface.
Is using the WPS button secure?
Using the physical push-button method is relatively secure because it requires physical access to the router. However, the overall protocol has known vulnerabilities, particularly the PIN-based connection method, which is susceptible to brute-force attacks. It is generally recommended to disable the feature once your devices are set up.
How do I connect a printer using the WPS button?
To connect a printer, first press the WPS button on your router until the light flashes. Within two minutes, navigate to the network or wireless settings on your printer and select the WPS setup option. The two devices will communicate and automatically establish a secure connection.
How do I disable the WPS function?
To disable the function, you must log into your router administrative console via a web browser or a mobile app. Navigate to the wireless or advanced security settings, locate the Wi-Fi Protected Setup or WPS section, and toggle the setting to Off. This is a highly recommended step for improving network security.
Why is the WPS light blinking on my router?
A blinking light indicates that the router is currently in discovery or pairing mode. It is actively looking for a compatible device to join the network. If you did not press the button and the light is blinking, it could mean a device is attempting to connect or that the button was pressed accidentally. Most lights will stop blinking after two minutes once the pairing window expires.
Conclusion
The WPS button remains a valuable tool for anyone building a connected home, offering a bridge for devices that lack sophisticated input methods. By knowing how to locate the button, understanding the timing of the network handshake, and being aware of the potential security trade-offs, you can manage your home network with confidence. Once your gadgets are synced, remember to revisit your router firmware settings to lock down your network and ensure your smart home stays both functional and secure.