Quick Facts
- Tools Needed: 6mm hex key and 12mm wrench
- Thread Direction: Left-hand thread (Clockwise to loosen)
- Safety First: Always unplug the saw before beginning any work
- Blade Orientation: Carbide teeth must point downward at the front of the saw
- Cleaning: Use a dry cloth or brush; never use compressed air on the guard
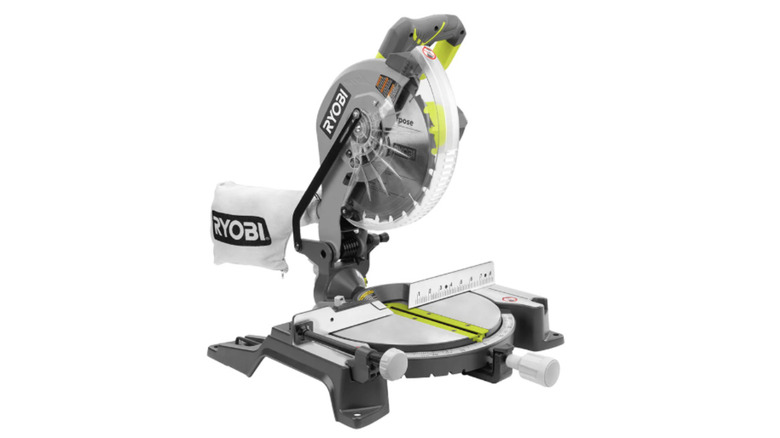
- Key Components: Spindle lock button, arbor bolt, and blade bolt cover screw
Performing a Ryobi blade replacement is a vital part of power tool maintenance that ensures crosscut accuracy and safety. Whether you are switching to a high-tooth count blade for fine finish work or replacing a dull 10-inch blade, understanding the specific mechanics—like the reverse-threaded arbor bolt—is key. This step-by-step guide walks you through how to change Ryobi miter saw blade safely and efficiently.
To perform a Ryobi blade replacement, first unplug the saw and lift the saw arm to the up position. Use a 6mm hex key to loosen the blade bolt cover screw and rotate the cover to expose the arbor bolt. While holding the spindle lock button, use a 12mm wrench to turn the bolt clockwise to loosen it, as it is reverse-threaded. Remove the outer washer and the old blade, then install the new blade with the teeth pointing downward toward the front of the saw.
Essential Preparation and Safety Protocols
Before you even touch the hardware on your tool, the most critical step in miter saw blade safety protocols is a complete power disconnection. Never rely on the trigger lock or the power switch; physically pull the plug from the outlet. This eliminates any risk of accidental startup while your fingers are near the sharp carbide teeth.
Once the power is cut, clear your workspace of any wood scraps or sawdust that might interfere with your movements. Raise the saw arm to its full height and engage the locking pin if your model has one to keep the arm stabilized. You will also need to manually retract the lower blade guard to gain clear access to the center of the blade. At this stage, it is helpful to verify you have the correct hex key size for Ryobi miter saw blade maintenance, which for most standard models is a 6mm hex wrench.
Proper power tool maintenance begins with having the right mindset. If you feel resistance or if the saw arm feels unstable, stop and reset. Ensuring the tool is firmly mounted to a workbench or a dedicated stand will make the following mechanical steps much smoother and safer.
Step 1: Accessing the Arbor Bolt
To get to the hardware holding the blade in place, you first have to move the blade bolt cover. On most Ryobi models, this is held by a single screw often referred to in manuals as Screw A. Using your 6mm hex wrench, loosen this screw. A common mistake is removing this screw entirely; you only need to loosen it enough so that the metal cover can pivot freely.
Once loosened, rotate the cover upward or backward (depending on your specific model) along with the lower blade guard. This movement will expose the central arbor bolt and the outer washer. If you find the guard is sticking, do not force it. Sometimes wood pitch or resin can build up in the pivot point. If this happens, a quick wipe with a dry cloth can help clear the obstruction. Following these Ryobi 10 inch miter saw blade change steps carefully ensures that you do not bend the guard linkage, which is essential for the tool to operate safely later.
Step 2: Removing the Blade (The Left-Hand Thread)
This is the stage where many DIYers run into trouble. The Ryobi miter saw utilizes a left-hand thread for its arbor bolt to ensure it remains tight during operation. This means you must rotate the wrench in a clockwise direction to loosen the bolt and a counter-clockwise direction to tighten it. It is the opposite of the standard "Righty-Tighty" rule we use for most household screws.
To remove the bolt, locate the spindle lock button, usually found on the motor housing behind the blade. Depress this button and rotate the blade by hand until you feel the lock engage, which prevents the blade from spinning. While holding the button down, use your 12mm wrench on the arbor bolt and turn it clockwise.
The blade bolt on Ryobi miter saws typically features left-handed threads, meaning the user must turn the bolt clockwise to loosen it and counterclockwise to tighten it during a blade replacement. Once the bolt is free, remove the outer washer. Take a moment to look at the blade. Knowing when to replace Ryobi miter saw blade often comes down to performance—if you see burn marks on your wood or if the carbide teeth look rounded or chipped, it is time for a change. Carefully slide the old blade off the arbor, being mindful of the sharp edges.
Step 3: Installing the New Blade
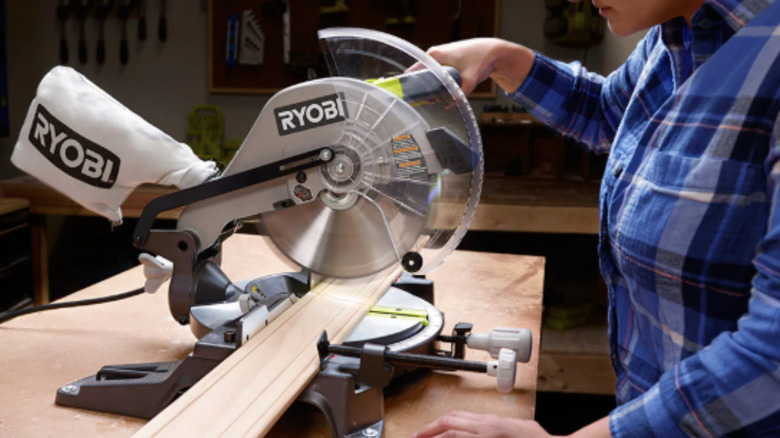
Before sliding your new blade onto the arbor, check the blade rotation direction. There is usually an arrow on the saw's permanent guard indicating which way the blade spins. The carbide teeth must always point downward at the front of the saw toward the fence. If you install the blade backward, it will not cut; it will simply rub against the wood, creating dangerous smoke and friction.
Slide the blade onto the arbor, ensuring it sits flush against the inner washer. Replace the outer washer, making sure the flat side faces the blade. While again engaging the spindle lock button, thread the arbor bolt in by hand turning it counter-clockwise. Once it is finger-tight, use the 12mm wrench to give it a firm snugging. Do not over-tighten; the natural rotation of the saw will keep the left-hand thread secure.
When choosing a new blade, consider the material you work with most. Here is a quick comparison to help you select from the best replacement blades for Ryobi miter saw projects:
| Blade Type | Tooth Count | Best Application | Result |
|---|---|---|---|
| Construction | 24T - 40T | Pressure-treated lumber, 2x4s | Fast, rough cuts |
| General Purpose | 50T - 60T | Softwoods, plywood, basic DIY | Versatile balance |
| Ultra-Fine Finish | 80T - 100T | Hardwood trim, molding, MDF | Mirror-smooth edges |
After the blade is secure, rotate the blade bolt cover back into its original position and tighten the 6mm screw. Manually lower and raise the guard a few times to ensure it moves smoothly and covers the blade completely when the saw arm is raised.
Ryobi Miter Saw Maintenance and Calibration
A blade change is the perfect opportunity to perform general Ryobi miter saw maintenance. Take a dry cloth and wipe down the lower blade guard and the area around the arbor. Avoid using compressed air, which can force fine sawdust into the motor bearings or the pivot spring, causing premature wear. Also, avoid harsh chemical solvents on the plastic parts of the guard, as they can make the plastic brittle over time.
Check the dust extraction port for any clogs. A clear port ensures that the vacuum or dust bag can effectively pull debris away from your cut line. More importantly, you should consider adjusting Ryobi miter saw after blade change to ensure continued precision. Even a slight difference in blade thickness (kerf) can affect your scale readings.
Use a machinist square to verify that the blade is perfectly 90 degrees to the fence and the table. If it is slightly off, loosen the bevel or miter adjustment handles and recalibrate the saw according to the owner's manual. Taking five minutes to square your saw now prevents ruined workpieces and frustration later.
FAQ
Which way does a Ryobi mower blade go on?
Just like the miter saw, the cutting edge of a Ryobi mower blade must face the direction of rotation. Typically, the "wings" or curved ends of the mower blade should point up toward the mower deck, while the sharpened cutting edge should face the grass. Many Ryobi blades are stamped with "This side toward grass" to prevent installation errors.
What tools are needed to replace a Ryobi mower blade?
While the miter saw uses metric wrenches, a Ryobi mower blade usually requires a 15mm or 17mm wrench or socket, depending on the model. You will also need a heavy block of wood to wedge between the blade and the mower deck to prevent the blade from spinning while you loosen the central nut.
How do I remove a stuck mower blade on a Ryobi?
If a mower blade is stuck due to rust or debris, apply a penetrating oil like WD-40 Specialist to the nut and let it sit for 15 minutes. Use a long-handled socket wrench for better leverage. Similar to the miter saw, check if your specific mower model uses a standard or reverse thread before applying heavy force.
Can I sharpen a Ryobi mower blade instead of replacing it?
Yes, you can sharpen a Ryobi mower blade using a metal file or an angle grinder if the blade is not cracked or severely bent. However, you must balance the blade afterward using a blade balancer tool. If the blade is out of balance, it will cause vibrations that can damage the mower's motor or spindle, much like a dull or warped miter saw blade ruins crosscut accuracy.
Maintaining your Ryobi tools through regular blade changes and calibration is the best way to ensure professional results in your home workshop. By following these steps and respecting the safety protocols, you keep your equipment running smoothly and your projects looking sharp.